

I asked ChatGPT to turn a magnifying glass’s black grip copper. It did. It also recolored part of the collar I had asked it to leave alone, and changed the image’s aspect ratio.
The illustration still looked like mine. That made the extra changes easy to miss.
For this softDev23 test, I used one illustration and a three-step plan. Change the grip, replace the background, then fit the result into a square. Each step uses the previous result, so an unwanted change can carry into the next edit.
The square-format step worked. The earlier edits show why I still check the whole image. All three prompts, every result and the checklist are below, with no signup needed.
What this test covers
This is a test of the current ChatGPT Images interface, observed on September 12, 2026. The page title read “ChatGPT Images 2.5 | AI Image Generator.” All three downloaded results contain metadata naming gpt-image version 2.0.
I could not verify which backend model produced them. The page label and file metadata do not settle that question. This is not a comparison between model versions, and the mismatch alone does not show that a rollout is broken.
I saved the original, all three outputs and the exact prompts. There is no continuous screen recording of the generation process. This article compares the saved files.
OpenAI’s Images 2.5 announcement emphasizes precise edits and consistency across turns. Those are vendor claims. The images here show what happened in this one sequence.
My starting image was an existing softDev23 blog illustration. It has a dark magnifying glass, nested green cubes inside the lens, a black pedestal and a purple-lit room. The original file measures 1619 by 971 pixels, close to a 5:3 ratio.
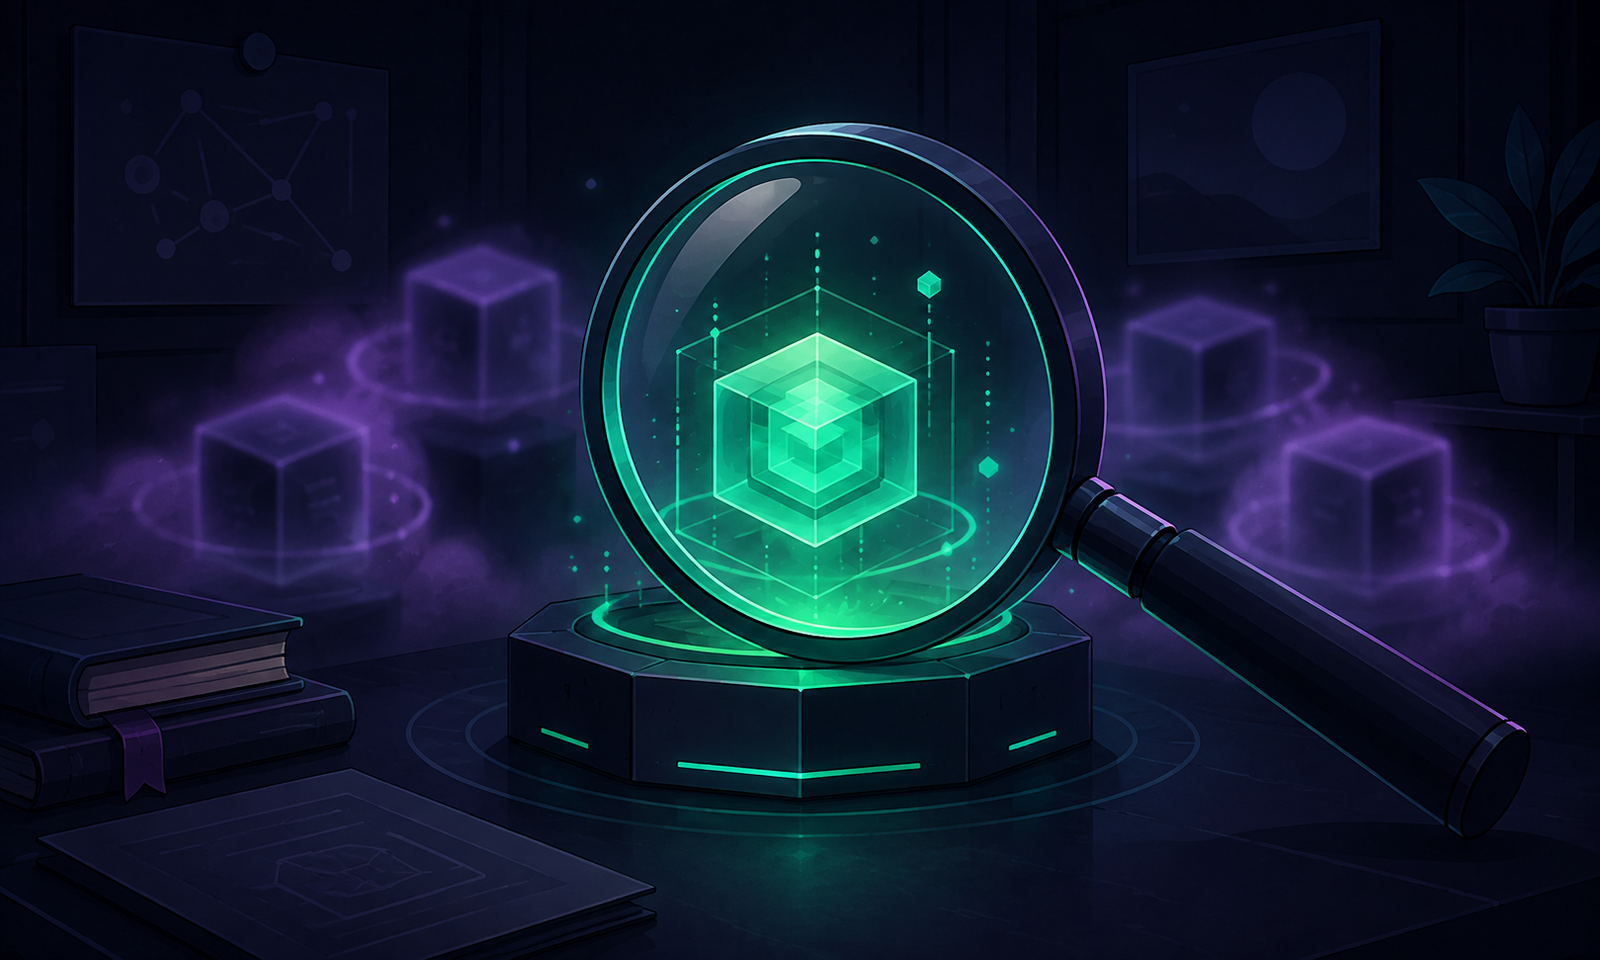
This uses ChatGPT’s image editor. My earlier OpenAI Image API article covers a separate automation workflow. Its historical prices are not pricing guidance for this test.
Edit one changed more than the grip
The copper color is clear, but the edit went beyond the requested area. A short collar section near the lens also turned copper. The prompt had explicitly excluded the collar rings.
This was the exact first prompt.
Edit the attached illustration. Change only the color of the magnifying glass's long, near-black cylindrical hand grip to a clearly visible warm copper-orange. This is the long grip pointing toward the lower-right corner. Keep its exact shape, length, diameter, angle, endpoint and existing highlights. Leave the small collar rings where the grip joins the lens unchanged.

Keep everything else as it is: the tilted round lens and double dark rim, the green nested cubes and fine green lines inside the lens, the black pedestal and its green light strips, all object positions, the books and papers, the room background, purple haze, lighting and illustrated style. Keep the same landscape framing and aspect ratio. Do not crop or add text, logos, objects or decorations. Return one edited image.
The output also changed to roughly 16:9, despite the request to preserve the ratio. Both versions are landscape images, so “it still looks wide” would have missed that failure.
The green cubes, pedestal, books and room remain recognizable. Fine lines and shading vary. I would describe this as a recognizable revision, not an exact color replacement with all other details preserved.
I kept the output unchanged for the next step. The copper collar therefore became part of edit two’s input.
Edit two replaced the background and shifted the lighting
The dark room became a much lighter lavender backdrop. The framed pictures, plant, floating purple cubes and haze disappeared as requested. The foreground objects stayed in broadly the same arrangement.
The input was the first browser result, selected through its own Edit image action. It was not a fresh copy of the original.
Edit the attached result from the previous step. Replace only the distant room background with a plain, softly lit, medium-lavender studio backdrop. Remove the rear wall panels and framed pictures, the background plant, the floating purple cubes and the purple haze. The new backdrop should be visibly lighter than the original dark room, with no new scenery or objects.

Preserve all foreground content exactly as it appears in this attached image: the complete magnifying glass, its grip color and collar rings, the green nested cubes and fine lines inside the lens, the black pedestal and green light strips, the foreground floor and circular markings, and the books and papers at the lower left. Preserve their shapes, positions, scale, perspective, colors, existing illumination and shadows. Do not change the contents of the lens. Keep the same landscape framing and aspect ratio. Do not crop or add text or logos. Return one edited image.
The result kept edit one’s dimensions and copper collar. The floor looks brighter and more purple, and the lens highlight has a more lavender tone. These are visual observations, not measured color differences.
That lighting shift may suit the new backdrop. It still matters here because the prompt asked to preserve the foreground’s existing illumination and shadows. A pleasing change can also be an unwanted change.
Edit three returned a square with the full subject visible
The final file is 1254 by 1254 pixels. The full lens, handle and pedestal fit inside the square, with space around them.
This prompt allowed the whole assembly to move and scale together. It also permitted cropping outer-edge books and papers. Those changes were intentional, so they do not count as failures.
The input was edit two’s actual output. This was the exact third prompt.
Adapt the attached illustration to a square 1:1 composition. Keep the complete magnifying glass, its full handle and the entire pedestal visible, with comfortable margins. You may scale and reposition that assembly as one unit to fit the square, and extend the existing backdrop or crop outer-edge floor, books and papers as needed.

Preserve the magnifying glass's silhouette and proportions, the lens-to-handle angle and connection, the grip color, the nested green cubes and fine lines inside the lens, the pedestal shape and green light strips, the foreground shading, the current backdrop color and the illustrated style. Do not stretch, bend, redesign, mirror or duplicate the assembly. Do not introduce new objects, text or logos. Return one square image.
The copper grip, green nested cubes and lavender setting remain recognizable. The copper collar from edit one is still there too. A later successful format change did not undo an earlier unwanted edit.
The square and full-subject requirements are visible successes. I would not claim that every fine line or proportion stayed identical from this full-image comparison. The result still needs the detail check that its intended use calls for.
Every result in this sequence
The gallery above retains all three browser results. Each step used the immediately preceding output, with no hidden repair or restoration of the original. These are not selections from a batch of alternative browser generations.
On smaller screens, scroll across the table to see every column.
| Image | Input | Actual size | Finding |
|---|---|---|---|
| Original | Existing illustration | 1619 × 971 | Reference image |
| Edit one | Original | 1672 × 941 | Grip changed, collar also recolored, ratio changed |
| Edit two | Edit one | 1672 × 941 | Background replaced, foreground lighting visibly shifted |
| Edit three | Edit two | 1254 × 1254 | Square returned, full assembly visible, earlier copper collar retained |
A separate earlier Codex preflight is excluded from this browser sequence. Its output was not the input for these edits. Each browser step has one recorded output and no corrective regeneration.
A preservation checklist you can reuse
Check what changed and what was supposed to stay the same as two separate questions. A successful requested edit does not answer both.
- Save the original, each prompt and each result. Make the next input explicit.
- Name the exact part to change. List nearby details that must stay untouched.
- Decide in advance whether lighting, cropping and repositioning are allowed.
- Compare each output with its immediate input, then with the original.
- Inspect small connections, outlines, reflections and repeated details. In this test, the collar mattered as much as the grip.
- Check the exported width and height. A landscape preview does not prove the original ratio survived.
- For a new format, check the full subject and its margins. Ignore only the layout changes you explicitly allowed.
- View the image at its intended display size, then inspect important details at a comparable scale.
- Keep unwanted results visible. If you make a correction, record it as another edit.
For your own image, replace the named objects and colors in these prompts with yours. Treat the preservation list as a checklist for review, not a guarantee that every instruction will be followed.
The sequence gave me a copper grip, a lavender background and a square file. It also changed details I had asked to preserve. For my website, the useful habit is to check both parts of that result before calling the asset finished.
This is one illustration and a small sequence. It does not establish a general success rate, faster generation, exact brand-color matching or better performance than another model.
If you want more practical AI tests and notes from the software I’m building, join the softDev23 newsletter.